Here’s an easy guide to update your 2023 content for 2024 - doing it in bulk, efficiently.
🔄 Updating 2023 Articles for 2024: The Bulk Method
Staying current is key, especially with blog posts or WooCommerce data. Your content transition from 2023 to 2024 shouldn't be a headache.
If you're using WordPress, it's surprisingly simple with just a couple of plugins:
What’s great about these two plugins is that you can buy them in a lifetime bundle of $169, covering unlimited websites.
Let me walk you through the steps to refresh your content:
1. Export All Posts Containing “2023”
First, use WP All Export to filter out posts with “2023”.
Go to All Export > New Export
From the dropdown menu on “Select Specific Post Type”, select “Posts”.
Click “Add Filtering Options”. Here, filter the Post Title, Excerpt, SEO Title, or SEO Meta Description containing “2023”.
If you’re using Yoast SEO Plugin, this is the SEO Title custom field:
_yoast_wpseo_title, and this is the SEO Meta Description custom field:_yoast_wpseo_descriptionIf you’re using the Squirrly SEO plugin (like me), use the SEO Title custom field:
_sq_title, and SEO Meta Description custom field:_sq_description
The end result of the filters will be like this.
Note: Since media files in the HTML content of posts might include 2023 in them, filtering the HTML content might be misleading. That’s why I skipped the content in this step.
Click “Customize Export File” to go to the next step. Here, from the “Available Data”, drop and drag ID, Title, Excerpt, and Permalink in the “Standard” list. Get the SEO Title and Meta Description custom fields from the “Custom Fields” List.
Choose “Export Type” as a CSV file.
You might want to save these settings as a template for later use. Give it a name such as “All Posts Including 2023”. You’ll have a screen like this.
Click “Continue” to go to the “Export Settings” page. Basically, you don’t need to make any changes here. I just give the export the same name as the export settings here. (Screenshot)
Click “Save & Run Export” to start the export. The export will take about one minute.
When the export is completed, download the CSV export file.
2. Replace “2023” with “2024” in the Export File
Next, import the CSV to Google Sheets and make the year update.
Create a new Google Sheet by clicking here. Name the Google Sheet as “All Posts Including 2023”.
File > Import > Upload the downloaded CSV file > Import Data
Select the “Title” Column and open the “Find and Replace” menu with the CMD + SHIFT + H keyboard shortcut for Mac. If you’re using Windows, use CTRL + SHIFT + H.
Find 2023 and replace it with 2024. Click the “Replace all” button. (Screenshot)
Repeat the same step by replacing 2023 with 2024 in the Excerpt, SEO Title, and SEO Description columns. It’s crucial not to do it across the whole Google Sheet since we don’t want to change the ID or Permalink of the posts.
Download the edited data to a CSV file: File > Download > CSV.
3. Import the Updated File for Bulk Editing
Finally, use WP All Import for the updated data.
WP All Import > New Import. Here, upload your updated CSV file.
Select “Existing Items”, and click “Continue to Step 2”. (Screenshot)
You don’t need to make any changes in this step. Just make sure that your data is imported properly. Click “Continue to Step 3“. (Screenshot)
Here, from the import file preview on the right, we’ll Drag & Drop the Title, Excerpt, SEO Title, and SEO Meta Description to the right places. There is no need to drag the other values.
Give it a name such as “Replace 2023 with 2024 in posts, “ and continue to step 4. (Screenshot)
Select “Records in this import file will be matched with Posts on your site based on...“ as “Post ID,” and Drag and drop the ID column in the import file preview on the right.
On the “For each record in this import file, every time this import is run...” options, only select the options given in this screenshot so that we’ll update only the titles, excerpts, SEO titles, and SEO descriptions of the posts. Continue to the next and final step.
Here, you’ll see a summary of the updates you’ll be making. (Screenshot).
Just go ahead and click “Confirm & Run Import”. Based on the number of posts you’ll be updating and your server speed, It will take some time to update the posts. (Screenshot 1, Screenshot 2)
And voila! You've successfully updated your content for 2024!
Best Picks
AI ENHANCEMENT TIPS
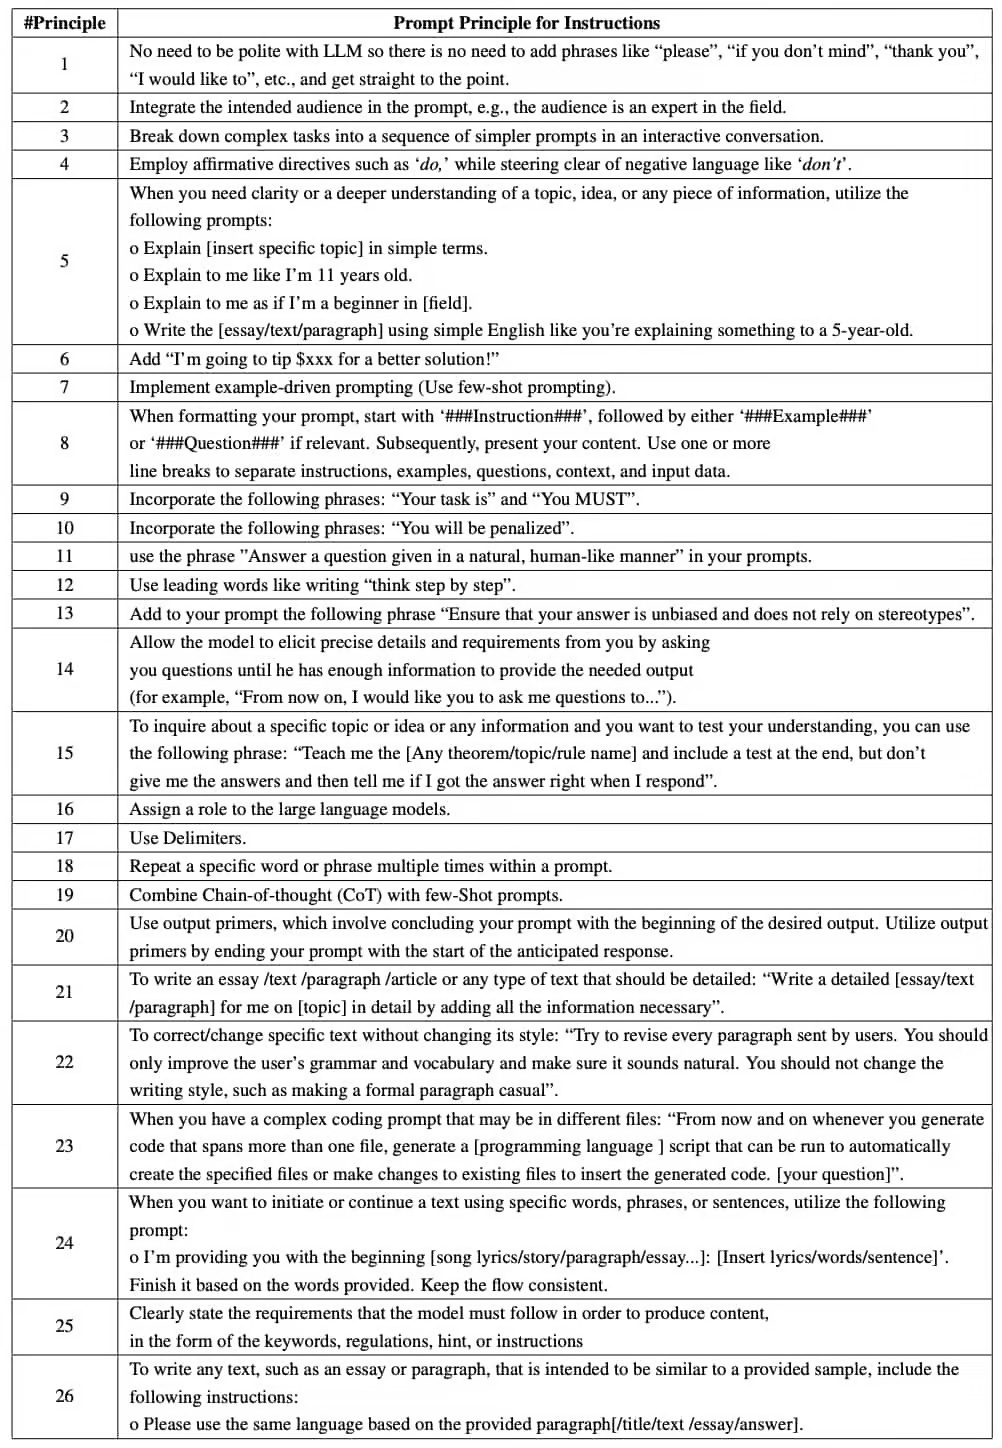
🤖 Boost ChatGPT Answers by up to 50%
A recent study unveiled a series of innovative techniques to significantly enhance the effectiveness of chatbots and advanced language models like GPT-4. The study highlights 26 specific prompting methods, which, when employed, consistently improved response quality by an impressive 50%.
Remember, it's not necessary to apply all 26 methods all the time to see a notable enhancement. Select and utilize the strategies that align with your specific goals.
For instance, to break down and grasp a complex concept, use this prompt format:
Assume you’re an expert in [topic]. Could you break down [subtopic] for me, as I'm new to the subject?
Until next time, stay productive! — Cagri Sarigoz


